GenAI Evaluation Quickstart
Need help setting up evaluation? Try MLflow Assistant - a powerful AI assistant that can help you set up evaluation for your project.
This quickstart guide will walk you through evaluating your GenAI applications with MLflow's comprehensive evaluation framework. In less than 5 minutes, you'll learn how to evaluate LLM outputs, use built-in and custom evaluation criteria, and analyze results in the MLflow UI.
Prerequisites
Depending on your Python environment, you may want to install the required packages by running the following command:
pip install openai
The code examples in this guide use the OpenAI SDK; however, MLflow's evaluation framework works with any LLM provider, including Anthropic, Google, Bedrock, and more.
Step 1: Set up your environment
MLflow stores evaluation results in a MLflow Tracking Server.
Start a local MLflow Tracking Server by executing one of the following methods.
- Local (uv)
- Local (pip)
- Local (docker)
Install the Python package manager uv
(that will also install uvx command to invoke Python tools without installing them).
Start a MLflow server locally.
uvx mlflow server
Python Environment: Python 3.10+
Install the mlflow Python package via pip and start a MLflow server locally.
pip install --upgrade 'mlflow[genai]'
mlflow server
MLflow provides a Docker Compose file to start a local MLflow server with a PostgreSQL database and a MinIO server.
git clone --depth 1 --filter=blob:none --sparse https://github.com/mlflow/mlflow.git
cd mlflow
git sparse-checkout set docker-compose
cd docker-compose
cp .env.dev.example .env
docker compose up -d
Refer to the instruction for more details (e.g., overriding the default environment variables).
Step 2: Create an evaluation script
Create a file named quickstart_eval.py. This script will contain your mock agent, evaluation dataset, scorers, and the evaluation execution. Alternatively, you may run this in a notebook.
Start with the environment setup:
# quickstart_eval.py
import os
import mlflow

# Configure environment
os.environ["OPENAI_API_KEY"] = "your-api-key-here"  # Replace with your API key
mlflow.set_experiment("GenAI Evaluation Quickstart")
Step 3: Define your mock agent's prediction function
First, we need to create a prediction function that takes a question and returns an answer. Here we use OpenAI's gpt-4o-mini model to generate the answer, but you can use any other LLM provider if you prefer.
Add your mock agent implementation to quickstart_eval.py:
from openai import OpenAI

client = OpenAI()


def my_agent(question: str) -> str:
    response = client.chat.completions.create(
        model="gpt-4o-mini",
        messages=[
            {
                "role": "system",
                "content": "You are a helpful assistant. Answer questions concisely.",
            },
            {"role": "user", "content": question},
        ],
    )
    return response.choices[0].message.content


def qa_predict_fn(question: str) -> str:
    """Wrapper function for evaluation using ``my_agent``."""
    return my_agent(question)
Step 4: Prepare an evaluation dataset
The evaluation dataset is a list of samples, each with an inputs and expectations field.
inputs: The input to thepredict_fnfunction above. The key(s) must match the parameter name of thepredict_fnfunction.expectations: The expected output from thepredict_fnfunction, namely, ground truth for the answer.
The dataset can be a list of dictionaries, a pandas DataFrame, a spark DataFrame. Here we use a list of dictionaries for simplicity.
# Define a simple Q&A dataset with questions and expected answers
eval_dataset = [
    {
        "inputs": {"question": "What is the capital of France?"},
        "expectations": {"expected_response": "Paris"},
    },
    {
        "inputs": {"question": "Who was the first person to build an airplane?"},
        "expectations": {"expected_response": "Wright Brothers"},
    },
    {
        "inputs": {"question": "Who wrote Romeo and Juliet?"},
        "expectations": {"expected_response": "William Shakespeare"},
    },
]
Step 5: Define evaluation criteria using Scorers
Scorer is a function that computes a score for a given input-output pair against various evaluation criteria. You can use built-in scorers provided by MLflow for common evaluation criteria, as well as create your own custom scorers.
from mlflow.genai import scorer
from mlflow.genai.scorers import Correctness, Guidelines


@scorer
def is_concise(outputs: str) -> bool:
    """Evaluate if the answer is concise (less than 5 words)"""
    return len(outputs.split()) <= 5


scorers = [
    Correctness(),
    Guidelines(name="is_english", guidelines="The answer must be in English"),
    is_concise,
]
Here we use three scorers:
- Correctness: Evaluates if the answer is factually correct, using the "expected_response" field in the dataset.
- Guidelines: Evaluates if the answer meets the given guidelines.
is_concise: A custom scorer defined using the scorer decorator to judge if the answer is concise (less than 5 words).
The first two scorers use LLMs to evaluate the response, so-called LLM-as-a-Judge. This is a powerful technique to assess the quality of the response, because it provides a human-like evaluation for complex language tasks while being more scalable and cost-effective than human evaluation.
The Scorer interface allows you to define various types of quality metrics for your application in a simple way. From a simple natural language guideline to a code function with the full control of the evaluation logic.
The default model used for LLM-as-a-Judge scorers such as Correctness and Guidelines is OpenAI gpt-4o-mini. MLflow supports all major LLM providers, such as Anthropic, Bedrock, Google, xAI, and more, through the built-in adopters and LiteLLM.Example of using different model providers for the judge model
# Anthropic
Correctness(model="anthropic:/claude-sonnet-4-20250514")

# Bedrock
Correctness(model="bedrock:/anthropic.claude-sonnet-4-20250514")

# Google
# Run `pip install litellm` to use Google as the judge model
Correctness(model="gemini/gemini-2.5-flash")

# xAI
# Run `pip install litellm` to use xAI as the judge model
Correctness(model="xai/grok-2-latest")
Step 6: Run the evaluation
Now we have all three components of the evaluation: dataset, prediction function, and scorers. Let's run the evaluation!
# Run evaluation
if __name__ == "__main__":
    results = mlflow.genai.evaluate(
        data=eval_dataset,
        predict_fn=qa_predict_fn,
        scorers=scorers,
    )
Now run your evaluation script:
- uv
- Python
uv run --with openai,mlflow quickstart_eval.py
python quickstart_eval.py
Complete Script
Here's the complete quickstart_eval.py for reference:
View complete script
# quickstart_eval.py
import os
import mlflow
from openai import OpenAI
from mlflow.genai import scorer
from mlflow.genai.scorers import Correctness, Guidelines

# Use different env variable when using a different LLM provider
os.environ["OPENAI_API_KEY"] = "your-api-key-here"
mlflow.set_experiment("GenAI Evaluation Quickstart")

# Your agent implementation
client = OpenAI()


def my_agent(question: str) -> str:
    response = client.chat.completions.create(
        model="gpt-4o-mini",
        messages=[
            {
                "role": "system",
                "content": "You are a helpful assistant. Answer questions concisely.",
            },
            {"role": "user", "content": question},
        ],
    )
    return response.choices[0].message.content


# Wrapper function for evaluation
def qa_predict_fn(question: str) -> str:
    return my_agent(question)


# Evaluation dataset
eval_dataset = [
    {
        "inputs": {"question": "What is the capital of France?"},
        "expectations": {"expected_response": "Paris"},
    },
    {
        "inputs": {"question": "Who was the first person to build an airplane?"},
        "expectations": {"expected_response": "Wright Brothers"},
    },
    {
        "inputs": {"question": "Who wrote Romeo and Juliet?"},
        "expectations": {"expected_response": "William Shakespeare"},
    },
]


# Scorers
@scorer
def is_concise(outputs: str) -> bool:
    return len(outputs.split()) <= 5


scorers = [
    Correctness(),
    Guidelines(name="is_english", guidelines="The answer must be in English"),
    is_concise,
]

# Run evaluation
if __name__ == "__main__":
    results = mlflow.genai.evaluate(
        data=eval_dataset,
        predict_fn=qa_predict_fn,
        scorers=scorers,
    )
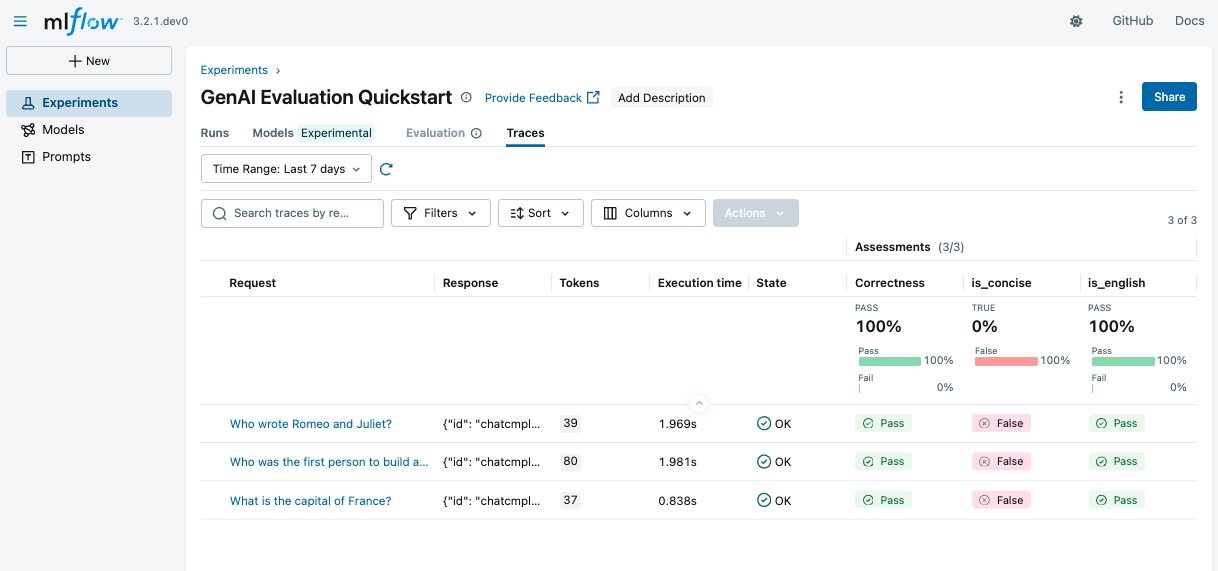
After running the code above, go to the MLflow UI and navigate to the "GenAI Evaluation Quickstart" experiment. You'll see the evaluation results with detailed metrics for each scorer.
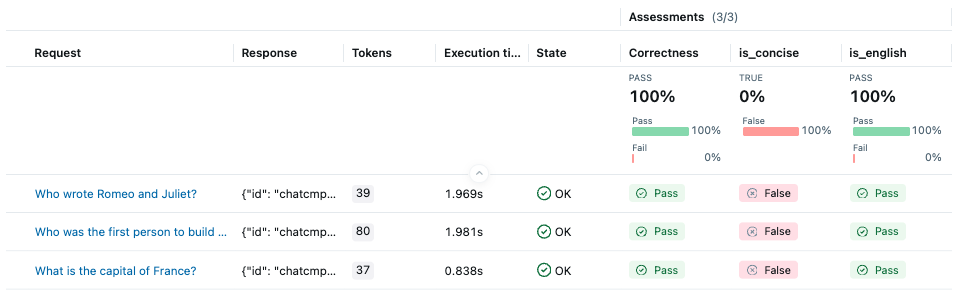
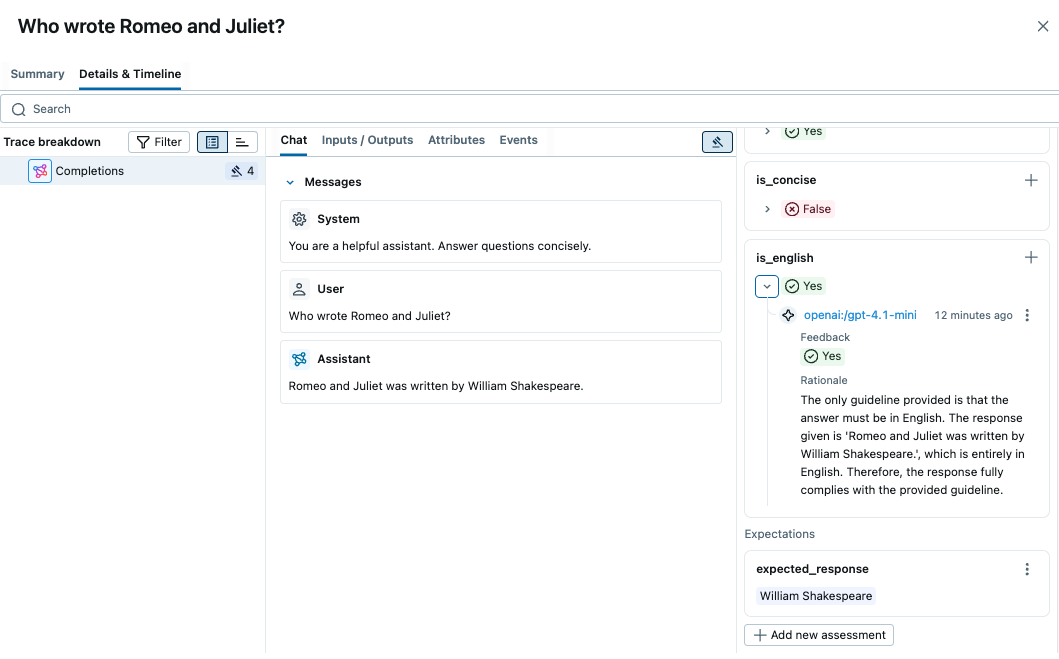
By clicking on the each row in the table, you can see the detailed rationale behind the score and the trace of the prediction.
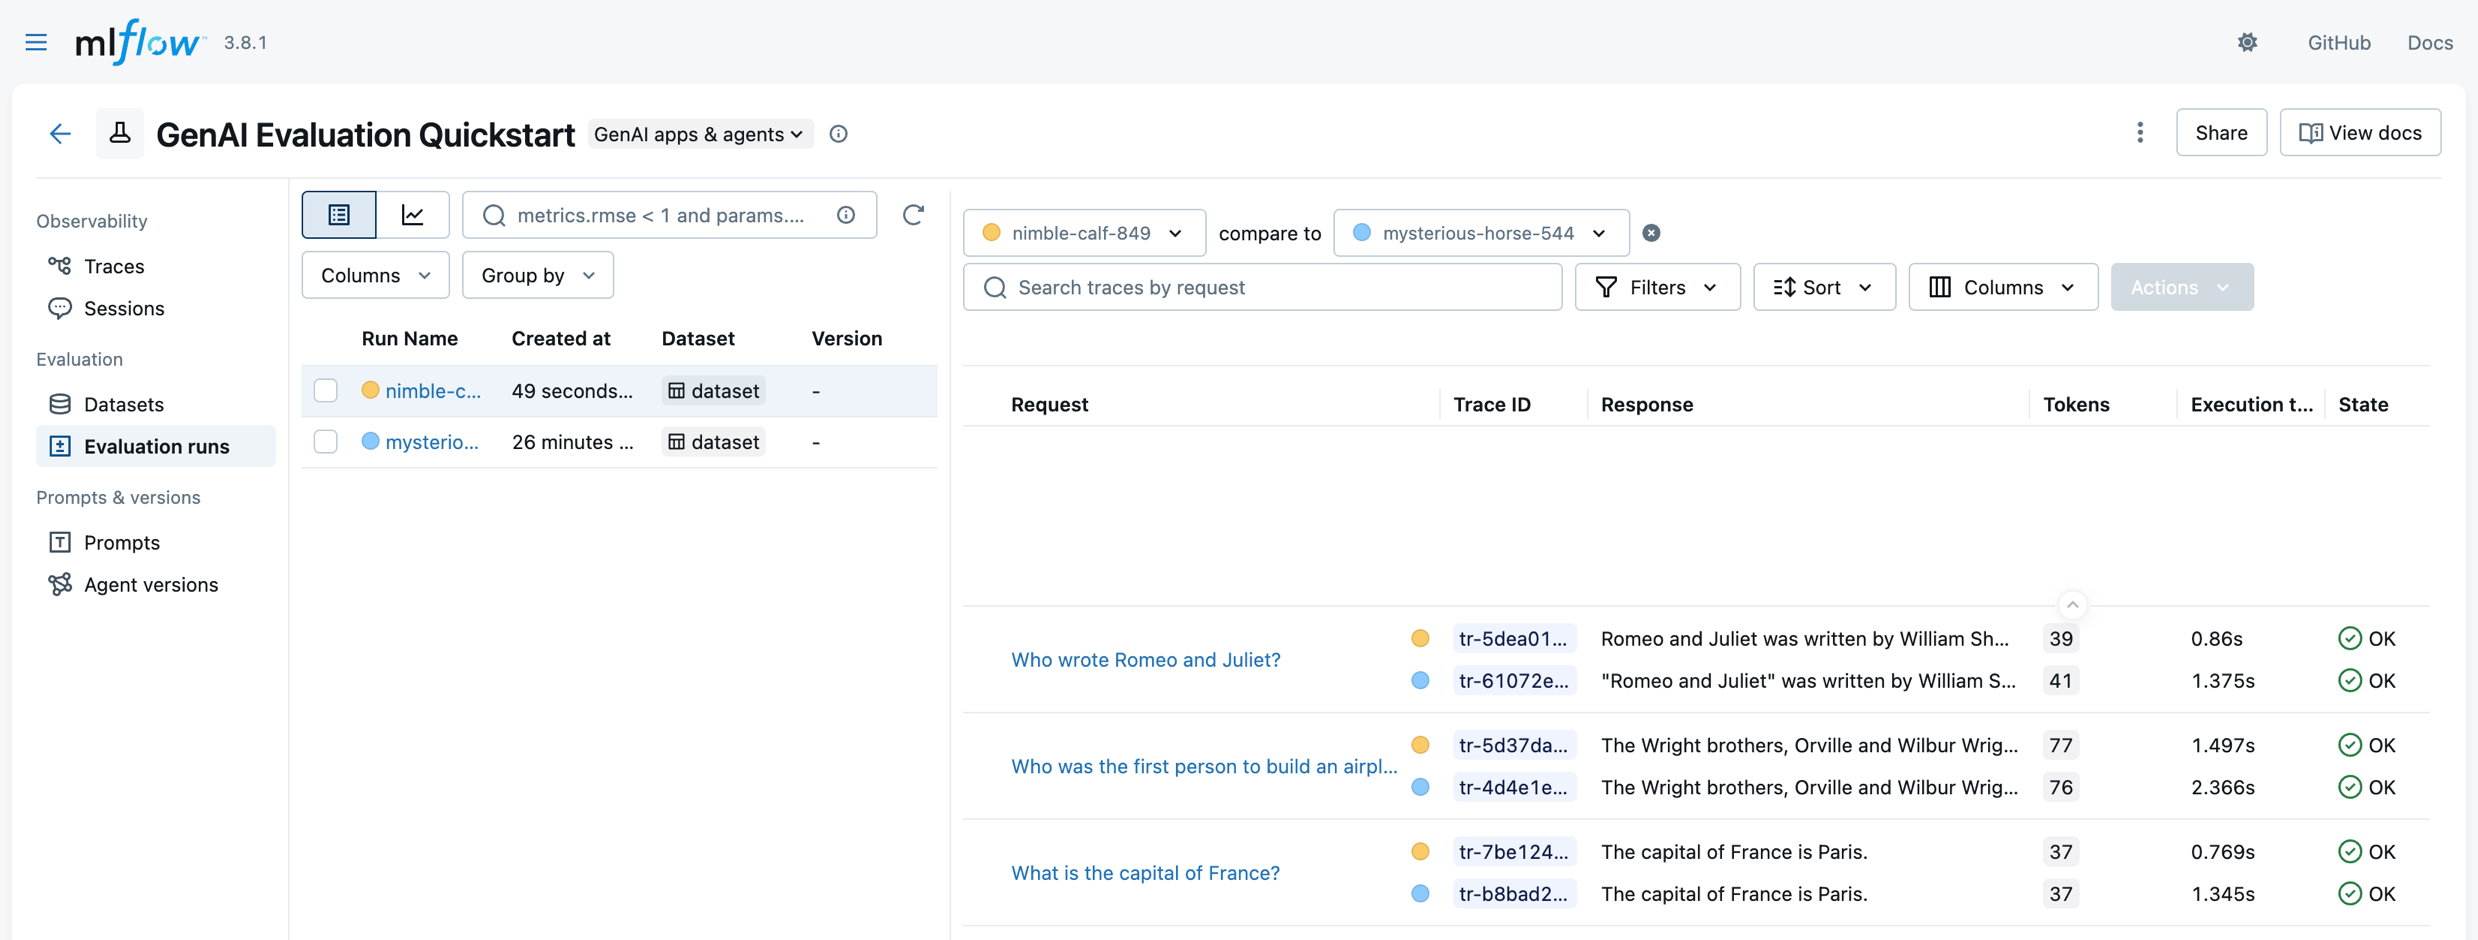
You can compare evaluation runs, too. Click on "Evaluation runs" menu (on the left) and select a run that you want to compare to a baseline run.
Summary
Congratulations! You've successfully:
- ✅ Set up MLflow GenAI Evaluation for your applications
- ✅ Evaluated a Q&A application with built-in scorers
- ✅ Created custom evaluation guidelines
- ✅ Learned to analyze results in the MLflow UI
MLflow's evaluation framework provides comprehensive tools for assessing GenAI application quality, helping you build more reliable and effective AI systems.