Tutorial: Custom GenAI Models using ChatModel
Starting in MLflow 3.0.0, we recommend ResponsesAgent instead of ChatModel. See more details in the ResponsesAgent Introduction.
The rapidly evolving landscape of Generative Artificial Intelligence (GenAI) presents exciting opportunities and integration challenges.
To leverage the latest GenAI advancements effectively, developers need a framework that balances flexibility with standardization.
MLflow addresses this need with the mlflow.pyfunc.ChatModel class introduced in
version 2.11.0, providing a
consistent interface for GenAI applications while simplifying deployment and testing.
Choosing Between ChatModel and PythonModel
When building GenAI applications in MLflow, it's essential to choose the right model abstraction that balances ease of use with the level of
customization you need. MLflow offers two primary classes for this purpose: mlflow.pyfunc.ChatModel
and mlflow.pyfunc.PythonModel. Each has its own strengths and trade-offs, making it crucial to understand which one best suits your use case.
| ChatModel | PythonModel | |
|---|---|---|
| When to use | Use when you want to develop and deploy a conversational model with standard chat schema compatible with OpenAI spec. | Use when you want full control over the model's interface or customize every aspect of your model's behavior. |
| Interface | Fixed to OpenAI's chat schema. | Full control over the model's input and output schema. |
| Setup | Quick. Works out of the box for conversational applications, with pre-defined model signature and input example. | Custom. You need to define model signature or input example yourself. |
| Complexity | Low. Standardized interface simplified model deployment and integration. | High. Deploying and integrating the custom PythonModel may not be straightforward. E.g., The model needs to handle Pandas DataFrames as MLflow converts input data to DataFrames before passing it to PythonModel. |
Purpose of this tutorial
This tutorial will guide you through the process of creating a custom chat agent using MLflow's mlflow.pyfunc.ChatModel class.
By the end of this tutorial you will:
- Integrate MLflow Tracing into a custom
mlflow.pyfunc.ChatModelinstance. - Customize your model using the
model_configparameter withinmlflow.pyfunc.log_model(). - Leverage standardized signature interfaces for simplified deployment.
- Recognize and avoid common pitfalls when extending the
mlflow.pyfunc.ChatModelclass.
Prerequisites
- Familiarity with MLflow logging APIs and GenAI concepts.
- MLflow version 2.11.0 or higher installed for use of
mlflow.pyfunc.ChatModel. - MLflow version 2.14.0 or higher installed for use of MLflow Tracing.
This tutorial uses the Databricks Foundation Model APIs purely as an example of interfacing with an external service. You can easily swap the provider example to use any managed LLM hosting service with ease (Amazon Bedrock, Azure AI Studio, OpenAI, Anthropic, and many others).
Core Concepts
- Tracing
- Customization
- Standardization
- Pitfalls
Tracing Customization for GenAI
MLflow Tracing allows you to monitor and log the execution of your model's methods, providing valuable insights during debugging and performance optimization.
In our example BasicAgent implementation we utilize two separate APIs for the initiation of trace spans: the decorator API and the fluent API.
Decorator API
@mlflow.trace
def _get_system_message(self, role: str) -> Dict:
    if role not in self.models:
        raise ValueError(f"Unknown role: {role}")

    instruction = self.models[role]["instruction"]
    return ChatMessage(role="system", content=instruction).to_dict()
Using the @mlflow.trace tracing decorator is the simplest way to add tracing functionality to functions and methods. By default, a span that is generated from
the application of this decorator will utilize the name of the function as the name of the span. It is possible to override this naming, as well as
other parameters associated with the span, as follows:
@mlflow.trace(name="custom_span_name", attributes={"key": "value"}, span_type="func")
def _get_system_message(self, role: str) -> Dict:
    if role not in self.models:
        raise ValueError(f"Unknown role: {role}")

    instruction = self.models[role]["instruction"]
    return ChatMessage(role="system", content=instruction).to_dict()
It is always advised to set a human-readable name for any span that you generate, particularly if you are instrumenting private or generically named functions or methods. The MLflow Trace UI will display the name of the function or method by default, which can be confusing to follow if your functions and methods are ambiguously named.
Fluent API
The fluent APIs context handler implementation for initiating spans is useful when you need full control of the logging of each aspect of the span's data.
The example from our application for ensuring that we're capturing the parameters that are set when loading the model via the load_context method is
shown below. We are pulling from the instance attributes self.models_config and self.models to set the attributes of the span.
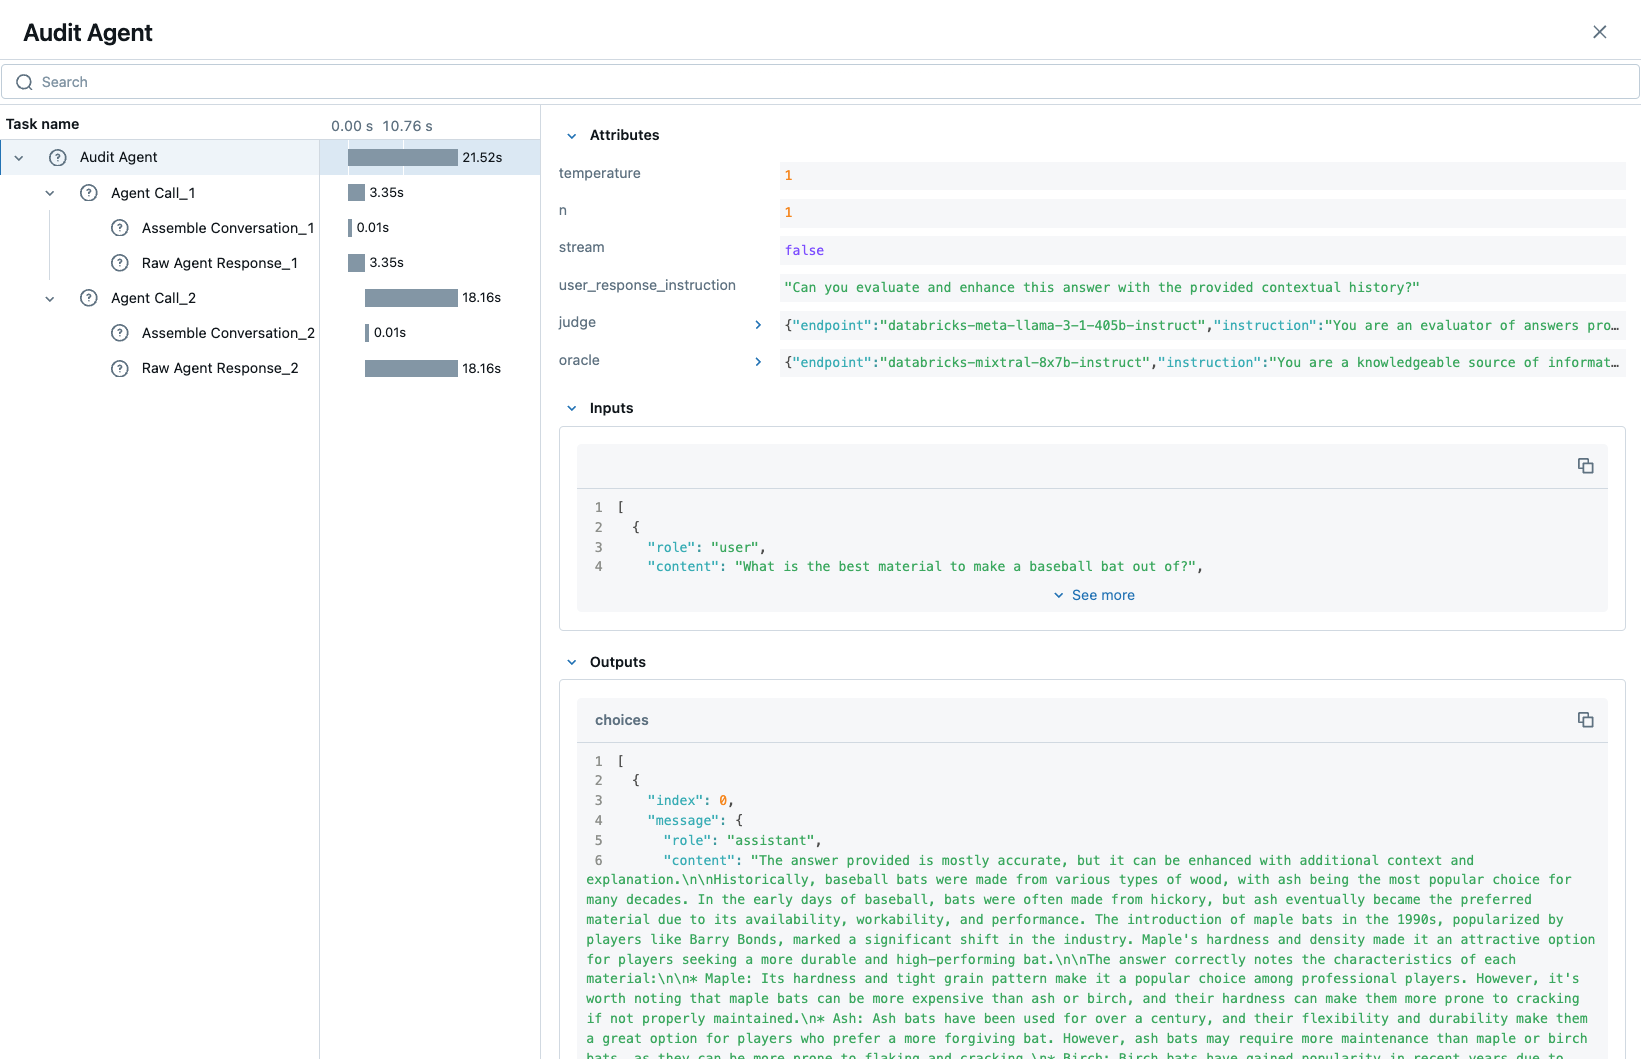
with mlflow.start_span("Audit Agent") as root_span:
    root_span.set_inputs(messages)
    attributes = {**params.to_dict(), **self.models_config, **self.models}
    root_span.set_attributes(attributes)
    # More span manipulation...
Traces in the MLflow UI
After running our example that includes these combined usage patterns for trace span generation and instrumentation,
Model Customization for GenAI
In order to control the behavior of our BasicAgent model without having to hard-code configuration values directly into our model logic, specifying
configurations within the model_config parameter when logging the model gives some flexibility and versatility to our model definition.
This functionality allows us to:
- Rapidly test different configurations without having to make changes to source code
- See the configuration that was used when logging different iterations directly in the MLflow UI
- Simplify the model code by decoupling the configuration from the implementation
In our example model, we set a standard set of configurations that control the behavior of the BasicAgent. The configuration
structure expected by the code is a dictionary with the following components:
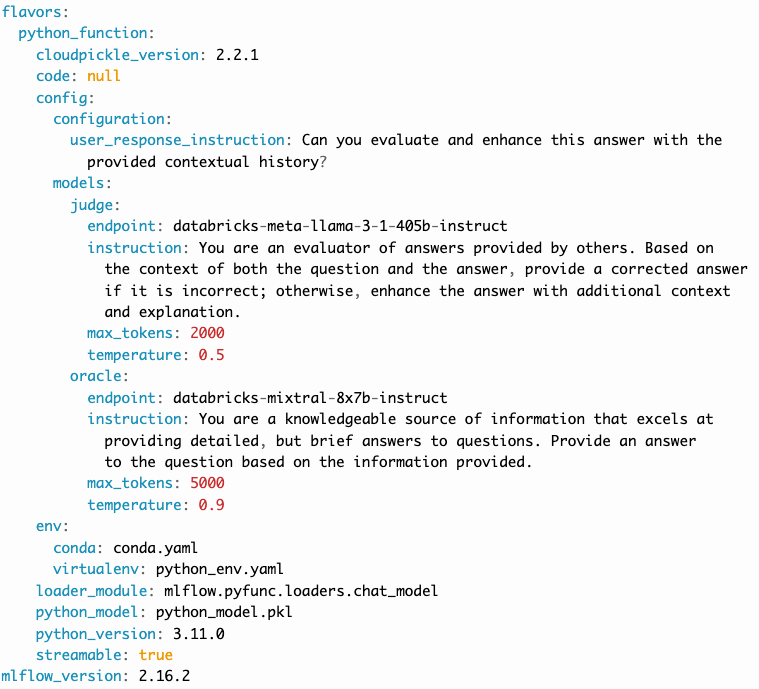
models: Defines the per-agent configurations.(model_name): Represents the role of the agent. This section contains:endpoint: The specific model type being used by the agent.instruction: The prompt given to the model, describing its role and responsibilities.temperature: The temperature setting controlling response variability.max_tokens: The maximum token limit for generating responses.
configuration: Contains miscellaneous settings for the agent application.user_response_instruction: Provides context for the second agent by simulating a user response based on the first agent's output.
This configuration structure definition will be:
- Defined when logging the model and structured to support the needs of the model's behavior
- Used by the load_context method and applied to the model when loading
- Logged within the MLmodel file and will be visible within the artifact viewer in the MLflow UI
The model_config values that are submitted for our BasicAgent example within this tutorial can be seen within the logged model's
MLmodel file in the UI:
Standardization for GenAI Models
One of the more complex tasks associated with deploying a GenAI application with MLflow arises when attempting to build a custom implementation
that is based on subclassing the mlflow.pyfunc.PythonModel abstraction.
While PythonModel is recommended for custom Deep Learning and traditional Machine Learning models (such as sklearn or torch models that require
additional processing logic apart from that of a base model), there are internal manipulations of the input data that occur
when serving these models that introduce unnecessary complications with GenAI applications.
Due to the fact that DL and traditional ML models largely rely on structured data, when input data is passed via a REST interface for model serving,
the PythonModel implementation will convert JSON data into pandas.DataFrame or numpy objects. This conversion creates a confusing and difficult to
debug scenario when using GenAI models. GenAI implementations generally deal exclusively with JSON-conformant data structures and have no tabular
representation that makes intuitive sense, thereby creating a frustrating and complex conversion interface needed to make application deployment function
correctly.
To simplify this problem, the mlflow.pyfunc.ChatModel class was created to provide a simpler interface for handling of the data
passed into and returned from a call to the predict() method on custom Python models serving GenAI use cases.
In the example tutorial code below, we subclass ChatModel in order to utilize this simplified interface with its immutable input and output
formats. Because of this immutability, we don't have to reason about model signatures, and can instead directly use API standards that have
been broadly accepted throughout the GenAI industry.
To illustrate why it is preferred to use ChatModel as a super class to custom GenAI implementations in MLflow, here is the signature that
would otherwise need to be defined and supplied during model logging to conform to the OpenAI API spec as of September 2024:
Input Schema as a dict:
[
    {
        "type": "array",
        "items": {
            "type": "object",
            "properties": {
                "content": {"type": "string", "required": True},
                "name": {"type": "string", "required": False},
                "role": {"type": "string", "required": True},
            },
        },
        "name": "messages",
        "required": True,
    },
    {"type": "double", "name": "temperature", "required": False},
    {"type": "long", "name": "max_tokens", "required": False},
    {"type": "array", "items": {"type": "string"}, "name": "stop", "required": False},
    {"type": "long", "name": "n", "required": False},
    {"type": "boolean", "name": "stream", "required": False},
    {"type": "double", "name": "top_p", "required": False},
    {"type": "long", "name": "top_k", "required": False},
    {"type": "double", "name": "frequency_penalty", "required": False},
    {"type": "double", "name": "presence_penalty", "required": False},
]
Agent-based (tool-calling) schemas are significantly more complex than the simpler chat interface example shown above. As GenAI frameworks and services
evolve with increasingly sophisticated capabilities and features, the complexity of these interfaces will grow, making manual schema definitions a
challenging and time-consuming task. The structured input validation provided by the MLflow mlflow.pyfunc.ChatModel interface removes the burden of defining and
managing these intricate signatures manually. By leveraging these pre-defined schemas, you gain robust input type safety and validation, ensuring your
deployed applications handle inputs consistently and correctly without additional effort. This approach not only reduces the risk of errors but also
streamlines the development process, allowing you to focus on building impactful GenAI solutions without the overhead of managing complex input specifications.
By using mlflow.pyfunc.ChatModel to base a custom implementation off of, we don't have to reason about this complex signature.
It is provided for us.
The only two considerations to be aware of when interfacing with the static signatures of ChatModel are:
- If the service that your custom implementation is interfacing with doesn't adhere to the
OpenAIspec, you will need to extract data from the standard structure ofmlflow.types.llm.ChatMessageandmlflow.types.llm.ChatParamsand ensure that it conforms to what your service is expecting. - The returned response from
predictshould adhere to the output structure defined within theChatModeloutput signature:mlflow.types.llm.ChatCompletionResponse.
Common GenAI pitfalls in MLflow
There are a number of ways that building a custom implementation for a GenAI use case can be frustrating or not intuitive. Here are some of the most common that we've heard from our users:
Not using a supported flavor
If you're working with a library that is natively supported in MLflow, leveraging the built-in support for logging and loading your implementation will always be easier than implementing a custom model. It is recommended to check the supported GenAI flavors to see if there is a built-in solution that will meet your use case needs in one of the many integrations that are available.
Misinterpreting what load_context does
While subclassing one of the base model types for a custom model, it may appear that the class definition is a "what you see is what you get" standard
Python class. However, when loading your custom model instance, the load_context method is actually called by another loader object.
Because of the implementation, you cannot have direct assignment of undefined instance attributes within load_context.
For example, this does not work:
from mlflow.pyfunc import ChatModel


class MyModel(ChatModel):
    def __init__(self):
        self.state = []

    def load_context(self, context):
        # This will fail on load as the instance attribute self.my_model_config is not defined
        self.my_model_config = context.get("my_model_config")
Instead, ensure that any instance attributes that are set by the load_context method are defined in the class constructor with a
placeholder value:
from mlflow.pyfunc import ChatModel


class MyModel(ChatModel):
    def __init__(self):
        self.state = []
        self.my_model_config = None  # Define the attribute here

    def load_context(self, context):
        self.my_model_config = context.get("my_model_config")
Failing to Handle Secrets securely
It might be tempting to simplify your model's deployment by specifying authentication secrets within a configuration. However, any configuration
data that is defined within your model_config parameters is directly visible in the MLflow UI and is not stored securely.
The recommended approach for handling sensitive configuration data such as API keys or access tokens is to utilize a Secret Manager.
The configuration for what to fetch from your secrets management system can be stored within the model_config definition and
your deployment environment can utilize a secure means of accessing the key reference for your secrets management service.
An effective place to handle secrets assignment (generally set as environment variables or passed as a part of request headers) is to
handle the acquisition and per-session setting within load_context. If you have rotating tokens, it is worthwhile to embed the acquisition
of secrets and re-fetching of them upon expiry as part of a retry mechanism within the call stack of predict.
Failing to use input_example
While it may seem that providing an input_example when logging a model in MLflow is purely for cosmetic purposes within the artifact view
display within the MLflow UI, there is an additional bit of functionality that makes providing this data very useful, particularly for GenAI
use cases.
When an input_example is provided, MLflow will call your model's predict method with the example data to validate that the input is
compatible with the model object that you are logging. If there are any failures that occur, you will receive an error message detailing
what is wrong with the input syntax. This is very beneficial to ensure that, at the point of logging, you can ensure that your expected
input interface structure is what will be allowable for the deployed model, thereby saving you hours of debugging and troubleshooting later
when attempting to deploy your solution.
It is highly recommended to supply this example during logging.
Failing to handle retries for Rate Limits being hit
Nearly all GenAI provider services impose rate limits and token-based usage limits to prevent disruption to their service or to help protect users from unexpected bills. When limits are reached, it is important that your prediction logic is robust to handle these failures to ensure that a user of your deployed application understands why their request was not successful.
It can be beneficial to introduce retry logic for certain errors, particularly those involving transient connection issues or per-unit-of-time request limits.
Not validating before deployment
The process of deploying a GenAI application can a significant amount of time. When an implementation is finally ready to be submitted to a
serving environment, the last thing that you want to deal with is a model that is incapable of being served due to some issue with a decoded
JSON payload being submitted to your model's predict() method.
MLflow offers the mlflow.models.validate_serving_input() API to ensure that the model that you have logged is capable of being interacted
with by emulating the data processing that occurs with a deployed model.
To use this API, simply navigate to your logged model with the MLflow UI's artifact viewer. The model display pane on the right side of the artifact viewer contains the code snippet that you can execute in an interactive environment to ensure that your model is ready to deploy.
For the example in this tutorial, this is the generated code that is copied from the artifact viewer display:
from mlflow.models import validate_serving_input

model_uri = "runs:/8935b7aff5a84f559b5fcc2af3e2ea31/model"

# The model is logged with an input example. MLflow converts
# it into the serving payload format for the deployed model endpoint,
# and saves it to 'serving_input_payload.json'
serving_payload = """{
"messages": [
    {
    "role": "user",
    "content": "What is a good recipe for baking scones that doesn't require a lot of skill?"
    }
],
"temperature": 1.0,
"n": 1,
"stream": false
}"""

# Validate the serving payload works on the model
validate_serving_input(model_uri, serving_payload)
Key Classes and Methods in our example
BasicAgent: Our custom chat agent class that extendsChatModel._get_system_message: Retrieves the system message configuration for a specific role.get_agent_response: Sends messages to an endpoint and retrieves responses._call_agent: Manages the conversation flow between the agent roles.prepare_message_list: Prepares the list of messages for sending.load_context: Initializes the model context and configurations.predict: Handles the prediction logic for the chat model.
Of these methods listed above, the methods load_context and predict override the base abstracted implementations of ChatModel. In order to
define a subclass of ChatModel, you must implement (at a minimum), the predict method. The load_context method is only used if you are implementing (as we
will be below) custom loading logic where a static configuration needs to be loaded for the model object to work, or additional dependent logic needs
to execute in order for the object instantiation to function correctly.
Example of a custom ChatModel
In the full example below, we're creating a custom chat agent by subclassing the mlflow.pyfunc.ChatModel. This agent, named BasicAgent,
takes advantage of several important features that help streamline the development, deployment, and tracking of GenAI applications. By subclassing ChatModel,
we ensure a consistent interface for handling conversational agents, while also avoiding common pitfalls associated with more general-purpose models.
The implementation below highlights the following key aspects:
- Tracing: We leverage MLflow's tracing functionality to track and log critical operations using both the decorator and fluent API context handler approaches.
- Decorator API: This is used to easily trace methods such as _get_agent_response and _call_agent for automatic span creation.
- Fluent API: Provides fine-grained control over span creation, as shown in the predict method for auditing key inputs and outputs during agent interactions.
- Tip: We ensure human-readable span names for easier debugging in the MLflow Trace UI and when fetching logged traces via the client API.
- Custom Configuration:
- Model Configuration: By passing custom configurations during model logging (using the model_config parameter), we decouple model behavior from hard-coded values. This allows rapid testing of different agent configurations without modifying the source code.
- load_context Method: Ensures that configurations are loaded at runtime, initializing the agent with the necessary settings and preventing runtime failures due to missing configurations.
- Tip: We avoid directly setting undefined instance attributes within load_context. Instead, all attributes are initialized with default values in the class constructor to ensure proper loading of our model.
- Conversation Management:
- We implement a multi-step agent interaction pattern using methods like _get_system_message, _get_agent_response, and _call_agent. These methods manage the flow of communication between multiple agents, such as an "oracle" and a "judge" role, each configured with specific instructions and parameters.
- Static Input/Output Structures: By adhering to the
ChatModel's required input (List[ChatMessage]) and output (ChatCompletionResponse) formats, we eliminate the complexities associated with converting JSON or tabular data, which is common in more general models likePythonModel.
- Common Pitfalls Avoided:
- Model Validation via Input Examples: We provide an input example during model logging, allowing MLflow to validate the input interface and catch structural issues early, reducing debugging time during deployment.
- Models from code:
- MLflow recommends using models from code when authoring GenAI agents or apps, for robust logging and straightforward deployment of agents containing arbitrary Python code.
import mlflow
from mlflow.types.llm import ChatCompletionResponse, ChatMessage, ChatParams, ChatChoice
from mlflow.pyfunc import ChatModel
from mlflow import deployments
from typing import List, Optional, Dict


class BasicAgent(ChatModel):
    def __init__(self):
        """Initialize the BasicAgent with placeholder values."""
        self.deploy_client = None
        self.models = {}
        self.models_config = {}
        self.conversation_history = []

    def load_context(self, context):
        """Initialize the connectors and model configurations."""
        self.deploy_client = deployments.get_deploy_client("databricks")
        self.models = context.model_config.get("models", {})
        self.models_config = context.model_config.get("configuration", {})

    def _get_system_message(self, role: str) -> Dict:
        """
        Get the system message configuration for the specified role.

        Args:
            role (str): The role of the agent (e.g., "oracle" or "judge").

        Returns:
            dict: The system message for the given role.
        """
        if role not in self.models:
            raise ValueError(f"Unknown role: {role}")

        instruction = self.models[role]["instruction"]
        return ChatMessage(role="system", content=instruction).to_dict()

    @mlflow.trace(name="Raw Agent Response")
    def _get_agent_response(
        self, message_list: List[Dict], endpoint: str, params: Optional[dict] = None
    ) -> Dict:
        """
        Call the agent endpoint to get a response.

        Args:
            message_list (List[Dict]): List of messages for the agent.
            endpoint (str): The agent's endpoint.
            params (Optional[dict]): Additional parameters for the call.

        Returns:
            dict: The response from the agent.
        """
        response = self.deploy_client.predict(
            endpoint=endpoint, inputs={"messages": message_list, **(params or {})}
        )
        return response["choices"][0]["message"]

    @mlflow.trace(name="Agent Call")
    def _call_agent(
        self, message: ChatMessage, role: str, params: Optional[dict] = None
    ) -> Dict:
        """
        Prepares and sends the request to a specific agent based on the role.

        Args:
            message (ChatMessage): The message to be processed.
            role (str): The role of the agent (e.g., "oracle" or "judge").
            params (Optional[dict]): Additional parameters for the call.

        Returns:
            dict: The response from the agent.
        """
        system_message = self._get_system_message(role)
        message_list = self._prepare_message_list(system_message, message)

        # Fetch agent response
        agent_config = self.models[role]
        response = self._get_agent_response(
            message_list, agent_config["endpoint"], params
        )

        # Update conversation history
        self.conversation_history.extend([message.to_dict(), response])
        return response

    @mlflow.trace(name="Assemble Conversation")
    def _prepare_message_list(
        self, system_message: Dict, user_message: ChatMessage
    ) -> List[Dict]:
        """
        Prepare the list of messages to send to the agent.

        Args:
            system_message (dict): The system message dictionary.
            user_message (ChatMessage): The user message.

        Returns:
            List[dict]: The complete list of messages to send.
        """
        user_prompt = {
            "role": "user",
            "content": self.models_config.get(
                "user_response_instruction", "Can you make the answer better?"
            ),
        }
        if self.conversation_history:
            return [system_message, *self.conversation_history, user_prompt]
        else:
            return [system_message, user_message.to_dict()]

    def predict(
        self, context, messages: List[ChatMessage], params: Optional[ChatParams] = None
    ) -> ChatCompletionResponse:
        """
        Predict method to handle agent conversation.

        Args:
            context: The MLflow context.
            messages (List[ChatMessage]): List of messages to process.
            params (Optional[ChatParams]): Additional parameters for the conversation.

        Returns:
            ChatCompletionResponse: The structured response object.
        """
        # Use the fluent API context handler to have added control over what is included in the span
        with mlflow.start_span(name="Audit Agent") as root_span:
            # Add the user input to the root span
            root_span.set_inputs(messages)

            # Add attributes to the root span
            attributes = {**params.to_dict(), **self.models_config, **self.models}
            root_span.set_attributes(attributes)

            # Initiate the conversation with the oracle
            oracle_params = self._get_model_params("oracle")
            oracle_response = self._call_agent(messages[0], "oracle", oracle_params)

            # Process the response with the judge
            judge_params = self._get_model_params("judge")
            judge_response = self._call_agent(
                ChatMessage(**oracle_response), "judge", judge_params
            )

            # Reset the conversation history and return the final response
            self.conversation_history = []

            output = ChatCompletionResponse(
                choices=[ChatChoice(index=0, message=ChatMessage(**judge_response))],
                usage={},
                model=judge_params.get("endpoint", "unknown"),
            )

            root_span.set_outputs(output)

        return output

    def _get_model_params(self, role: str) -> dict:
        """
        Retrieves model parameters for a given role.

        Args:
            role (str): The role of the agent (e.g., "oracle" or "judge").

        Returns:
            dict: A dictionary of parameters for the agent.
        """
        role_config = self.models.get(role, {})

        return {
            "temperature": role_config.get("temperature", 0.5),
            "max_tokens": role_config.get("max_tokens", 500),
        }


# IMPORTANT: specifies the Python ChatModel instance to use for inference requests when
# the model is loaded back
agent = BasicAgent()
mlflow.models.set_model(agent)
The snippet above defines our agent as a subclass of ChatModel. With the models from code approach, we call
mlflow.models.set_model, passing an instance of our BasicAgent, to indicate which model object to use for
inference when our agent is loaded back.
Save the agent code in a Python file, e.g. basic_agent.py. This is a key part of models from code - it enables
logging a file containing the model's code, rather than a serialized model object, bypassing serialization issues.
With our model defined in a code file, there's only one step left before we can log it:
we need to define the configuration for our model to be initialized with. This is done by defining our model_config configuration.
Setting our model_config values
Before logging the model, we need to define the configuration that governs the behavior of our model's agents. This decoupling of configuration from the core logic of the model allows us to easily test and compare different agent behaviors without needing to modify the model implementation. By using a flexible configuration system, we can efficiently experiment with different settings, making it much easier to iterate and fine-tune our model.
Why Decouple Configuration?
In the context of Generative AI (GenAI), agent behavior can vary greatly depending on the instruction sets and parameters (such as temperature or
max_tokens) given to each agent. If we hardcoded these configurations directly into our model's logic, each new test would require changing the
model's source code, leading to:
- Inefficiency: Changing source code for each test slows down the experimentation process.
- Increased Risk of Errors: Constantly modifying the source increases the chance of introducing bugs or unintended side effects.
- Lack of Reproducibility: Without a clear separation between code and configuration, tracking and reproducing the exact configuration used for a particular result becomes challenging.
By setting these values externally via the model_config parameter, we make the model flexible and adaptable to different test scenarios.
This approach also integrates seamlessly with MLflow's evaluation tools, such as mlflow.genai.evaluate(), which allows you to compare model
outputs across different configurations systematically.
Defining the Model Configuration
The configuration consists of two main sections:
-
Models: This section defines agent-specific configurations, such as the
judgeandoracleroles in this example. Each agent has:- An endpoint: Specifies the model type or service being used for this agent.
- An instruction: Defines the role and responsibilities of the agent (e.g., answering questions, evaluating responses).
- Temperature and Max Tokens: Controls the generation variability (
temperature) and token limit for responses.
-
General Configuration: Additional settings for the overall behavior of the model, such as how user responses should be framed for subsequent agents.
There are two options available for setting a model configuration: directly within the logging code (shown below) or by writing a configuration file
in yaml format to a local location whose path can be specified when defining the model_config argument during logging. To learn more about
how the model_config parameter is utilized, see the guide on model_config usage.
Here's how we set the configuration for our agents:
model_config = {
    "models": {
        "judge": {
            "endpoint": "databricks-meta-llama-3-1-405b-instruct",
            "instruction": (
                "You are an evaluator of answers provided by others. Based on the context of both the question and the answer, "
                "provide a corrected answer if it is incorrect; otherwise, enhance the answer with additional context and explanation."
            ),
            "temperature": 0.5,
            "max_tokens": 2000,
        },
        "oracle": {
            "endpoint": "databricks-mixtral-8x7b-instruct",
            "instruction": (
                "You are a knowledgeable source of information that excels at providing detailed, but brief answers to questions. "
                "Provide an answer to the question based on the information provided."
            ),
            "temperature": 0.9,
            "max_tokens": 5000,
        },
    },
    "configuration": {
        "user_response_instruction": "Can you evaluate and enhance this answer with the provided contextual history?"
    },
}
Benefits of External Configuration
- Flexibility: The decoupled configuration allows us to easily switch or adjust model behavior without modifying the core logic. For example, we can
change the model's instructions or adjust the
temperatureto test different levels of creativity in the responses. - Scalability: As more agents are added to the system or new roles are introduced, we can extend this configuration without cluttering the model's code. This separation keeps the codebase cleaner and more maintainable.
- Reproducibility and Comparison: By keeping configuration external, we can log the specific settings used in each run with MLflow. This makes it easier to reproduce results and compare different experiments, ensuring a robust evaluation and adjudication process to select the best performing configuration.
With the configuration in place, we're now ready to log the model and run experiments using these settings. By leveraging MLflow's powerful tracking and logging features, we'll be able to manage the experiments efficiently and extract valuable insights from the agent's responses.
Defining an Input Example
Before logging our model, it's important to provide an input_example that demonstrates how to interact with the model. This example serves several key purposes:
- Validation at Logging Time: Including an
input_exampleallows MLflow to execute thepredictmethod using this example during the logging process. This helps validate that your model can handle the expected input format and catch any issues early. - UI Representation: The
input_exampleis displayed in the MLflow UI under the model's artifacts. This provides a convenient reference for users to understand the expected input structure when interacting with the deployed model.
By providing an input example, you ensure that your model is tested with real data, increasing confidence that it will behave as expected when deployed.
When defining your GenAI application using the mlflow.pyfunc.ChatModel, a default placeholder input example will be used if none is provided.
If you notice an unfamiliar or generic input example in the MLflow UI's artifact viewer, it's likely the default placeholder assigned by the system.
To avoid this, ensure you specify a custom input example when saving your model.
Here's the input example we'll use:
input_example = {
    "messages": [
        {
            "role": "user",
            "content": "What is a good recipe for baking scones that doesn't require a lot of skill?",
        }
    ]
}
This example represents a user asking for an easy scone recipe. It aligns with the input structure expected by our BasicAgent model, which processes a
list of messages where each message includes a role and content.
Benefits of Providing an Input Example:
- Execution and Validation: MLflow will pass this
input_exampleto the model'spredictmethod during logging to ensure that it can process the input without errors. Any issues with input handling, such as incorrect data types or missing fields, will be caught at this stage, saving you time debugging later. - User Interface Display: The
input_examplewill be visible in the MLflow UI within the model artifact view section. This helps users understand the format of input data the model expects, making it easier to interact with the model once it's deployed. - Deployment Confidence: By validating the model with an example input upfront, you gain additional assurance that the model will function correctly in a production environment, reducing the risk of unexpected behavior after deployment.
Including an input_example is a simple yet powerful step to verify that your model is ready for deployment and will behave as expected when
receiving input from users.
Logging and Loading our custom Agent
To log and load the model using MLflow, use:
with mlflow.start_run():
    model_info = mlflow.pyfunc.log_model(
        name="model",
        # If needed, update `python_model` to the Python file containing your agent code
        python_model="basic_agent.py",
        model_config=model_config,
        input_example=input_example,
    )

loaded = mlflow.pyfunc.load_model(model_info.model_uri)

response = loaded.predict(
    {
        "messages": [
            {
                "role": "user",
                "content": "What is the best material to make a baseball bat out of?",
            }
        ]
    }
)
Conclusion
In this tutorial, you have explored the process of creating a custom GenAI chat agent using MLflow's mlflow.pyfunc.ChatModel class.
We demonstrated how to implement a flexible, scalable, and standardized approach to managing the deployment of GenAI applications, enabling you
to harness the latest advancements in AI, even for libraries and frameworks that are not yet natively supported with a named flavor in MLflow.
By using ChatModel instead of the more generic PythonModel, you can avoid many of the common pitfalls associated with deploying GenAI by
leveraging the benefits of immutable signature interfaces that are consistent across any of your deployed GenAI interfaces, simplifying the
use of all of your solutions by providing a consistent experience.
Key takeaways from this tutorial include:
- Tracing and Monitoring: By integrating tracing directly into the model, you gain valuable insights into the internal workings of your application, making debugging and optimization more straightforward. Both the decorator and fluent API approaches offer versatile ways to manage tracing for critical operations.
- Flexible Configuration Management: Decoupling configurations from your model code ensures that you can rapidly test and iterate without modifying source code. This approach not only streamlines experimentation but also enhances reproducibility and scalability as your application evolves.
- Standardized Input and Output Structures: Leveraging the static signatures of
ChatModelsimplifies the complexities of deploying and serving GenAI models. By adhering to established standards, you reduce the friction typically associated with integrating and validating input/output formats. - Avoiding Common Pitfalls: Throughout the implementation, we highlighted best practices to avoid common issues, such as proper handling of secrets, validating input examples, and understanding the nuances of loading context. Following these practices ensures that your model remains secure, robust, and reliable in production environments.
- Validation and Deployment Readiness: The importance of validating your model before deployment cannot be overstated. By using tools
like
mlflow.models.validate_serving_input(), you can catch and resolve potential deployment issues early, saving time and effort during the production deployment process.
As the landscape of Generative AI continues to evolve, building adaptable and standardized models will be crucial to leveraging the exciting and powerful capabilities that will be unlocked in the months and years ahead. The approach covered in this tutorial equips you with a robust framework for integrating and managing GenAI technologies within MLflow, empowering you to develop, track, and deploy sophisticated AI solutions with ease.
We encourage you to extend and customize this foundational example to suit your specific needs and explore further enhancements. By leveraging MLflow's growing capabilities, you can continue to refine your GenAI models, ensuring they deliver impactful and reliable results in any application.