Streamline your MLflow Projects with Free Hosted MLflow
If you're new to MLflow and want to get started with a fully-managed and completely free deployment of MLflow, this blog will show you how to get started using MLflow in minutes.
Streamline Your ML Projects: Get Started with Hosted MLflow for Free
Explore the world of big data and machine learning with Databricks Community Edition (CE), a free, limited1 version of the Databricks platform. Ideal for beginners and those new to Databricks and MLflow, this edition streamlines the learning curve by offering a managed environment. It eliminates the complexity of manually setting up a tracking server. Databricks CE includes hosted MLflow, enabling efficient management and visualization of your MLflow experiments. This makes it a prime choice for developing machine learning projects in a user-friendly interface, allowing you to connect from your favorite IDE, notebook environment, or even from within Databricks CE's notebooks.
Benefits of Using Databricks CE for MLflow
MLflow is an open-source framework compatible with any platform, yet it offers distinct benefits when used on Databricks (including the Community Edition, CE) compared to other platforms. These advantages include:
-
Cost-Effective: Free of charge, MLflow on Databricks CE is perfect for educational purposes and small-scale projects.
-
Simple Setup: Gain access to a fully managed tracking server and user interface from any location. To connect to Databricks CE, just execute
mlflow.login(). -
Easy Sharing: In the Databricks ecosystem, sharing your notebooks is straightforward and hassle-free.
-
Seamless Integration: Databricks CE allows for direct storage and visualization of MLflow experiments, runs, and models.
-
Scalability: MLflow on Databricks CE provides an easy path to scale your projects. It also integrates seamlessly with a wide range of data tools available on the Databricks platform.
Scenario
In this blog, we will walk through running ML experiments on your local device and tracking them on an MLflow tracking server hosted on Databricks CE
To give you an idea of the options available for running MLflow, the figure below shows what is possible for common setup configurations.
![]()
For this blog, we're showing #3, using a remote (fully managed) tracking server.
Step-by-Step Guide
1. Creating a Databricks CE Account
If you haven't already, you can sign up for a free account. The process is quick, typically taking no more than 3 minutes.
Fill out the signup form and select “Get started with Community Edition.”
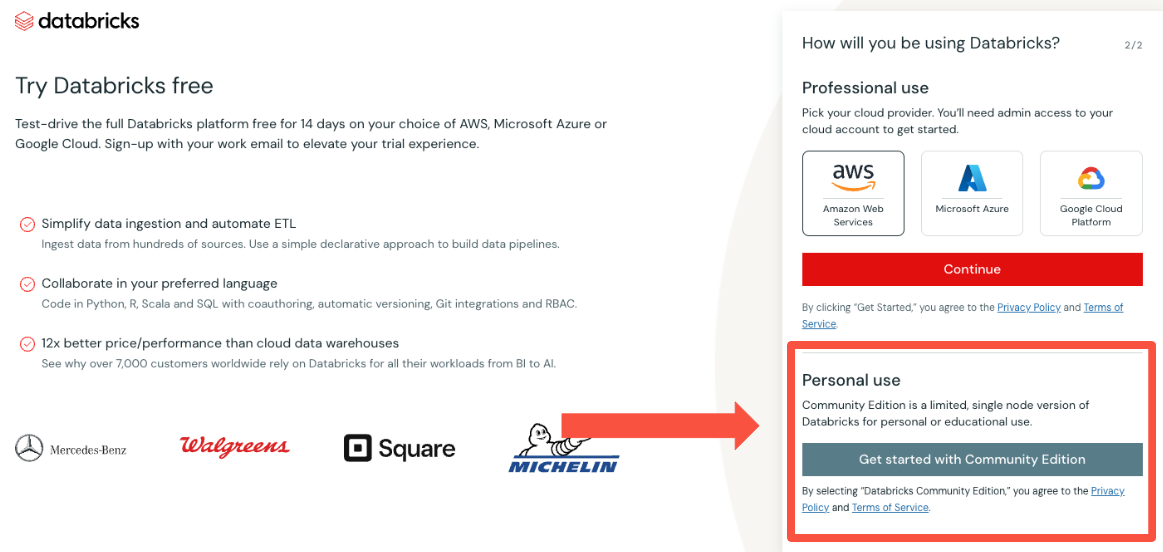
Once signed up, you'll get information on how to set a password that you can use to login to CE with2.
2. Installing Dependencies
Before you start, ensure that you have the necessary packages installed. Run the following command in your favorite IDE or notebook from your device:
%pip install -q mlflow databricks-sdk
3. Setting Up Databricks CE Authentication
The main advantage of Databricks Community Edition (CE) is its convenience: it offers an MLflow tracking server without requiring local infrastructure setup. You can easily access this server through the mlflow.login() function after creating your CE account, streamlining the process for MLflow experiment tracking.
To authenticate with Databricks CE, use the mlflow.login() function. This will prompt you for:
-
Databricks Host:
https://community.cloud.databricks.com/ -
Username: Your Databricks CE email address.
-
Password: Your Databricks CE password.
Upon successful authentication, you will see a confirmation message.
import mlflow

mlflow.login()

# Follow the prompts for authentication
4. Connect to Hosted MLflow and Track Experiments with Databricks CE
After you login from your local machine, start an experiment with mlflow.set_experiment() and log some metrics. For instance:
mlflow.set_experiment("/Users/\<email>/check-databricks-ce-connection")

with mlflow.start_run():

    mlflow.log_metric("foo", 1)

    mlflow.log_metric("bar", 2)
Note: The Databricks environment requires you to set experiments with the directory (from root)
/Users/{your email address for your account}/{name of your experiment}, which is different from the behavior in self-hosted MLflow (and when running MLFlow locally).
5. Viewing Your Experiment in Databricks CE
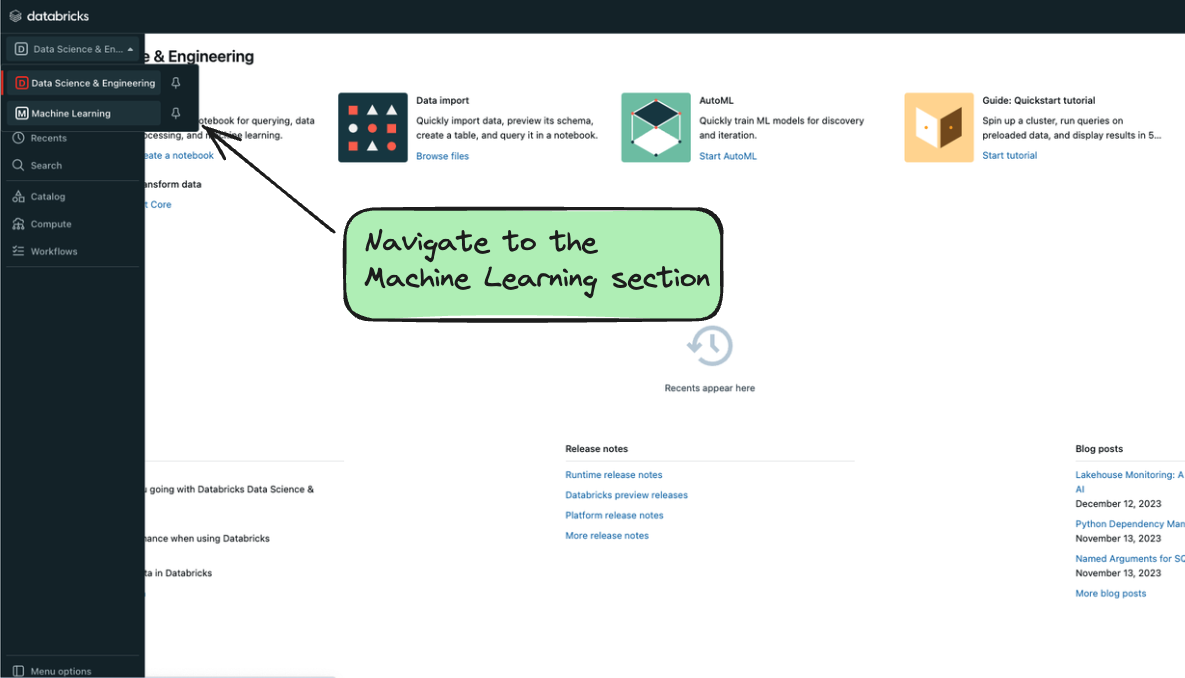
Now let’s navigate to Databricks CE to view the experiment result. Log in to your Databricks CE account, and click on the top left to select machine learning in the drop down list. Finally, click on the experiment icon. See the screenshots below:
Navigate to the Machine Learning Section
Navigate to the MLflow UI
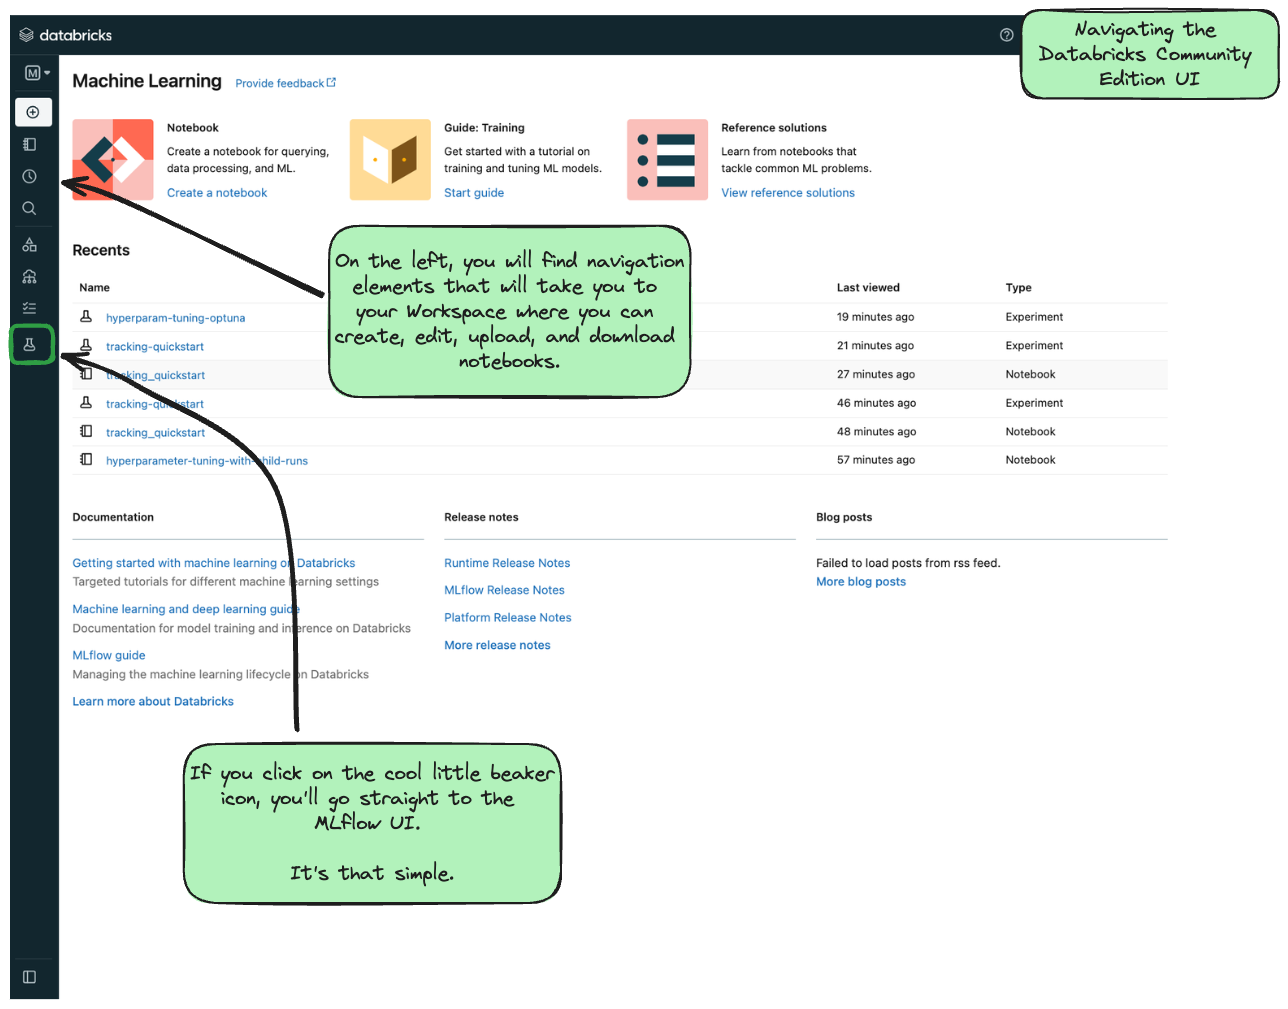
In the “Experiments” view, you should be able to find the experiment /Users/{your email}/check-databricks-ce-connection, similar to:

Clicking on the run name, which in this example is 'youthful-lamb-287' (note that you will see a different, randomly generated name in your CE console), will take you to the run view that looks similar to the following:
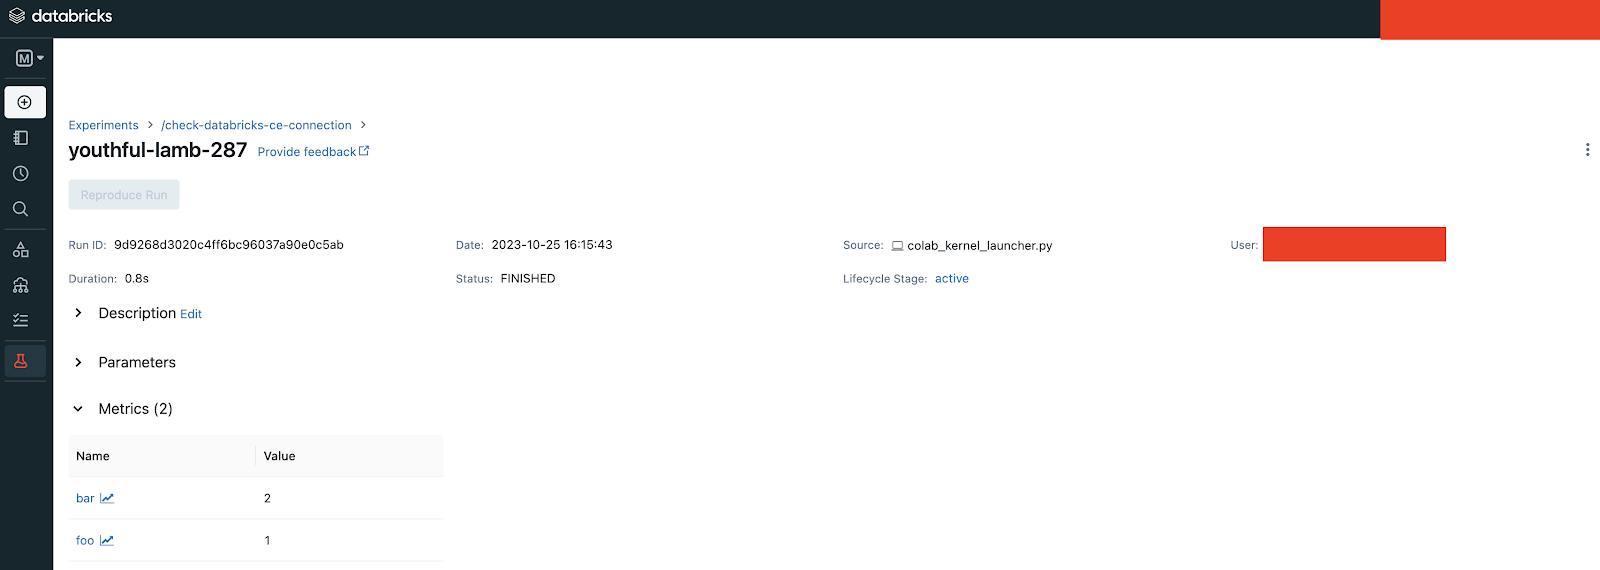
In the run view, you will see our dummy metrics “foo” and “bar” have been logged successfully.
6. Run any MLflow tutorial in Databricks CE
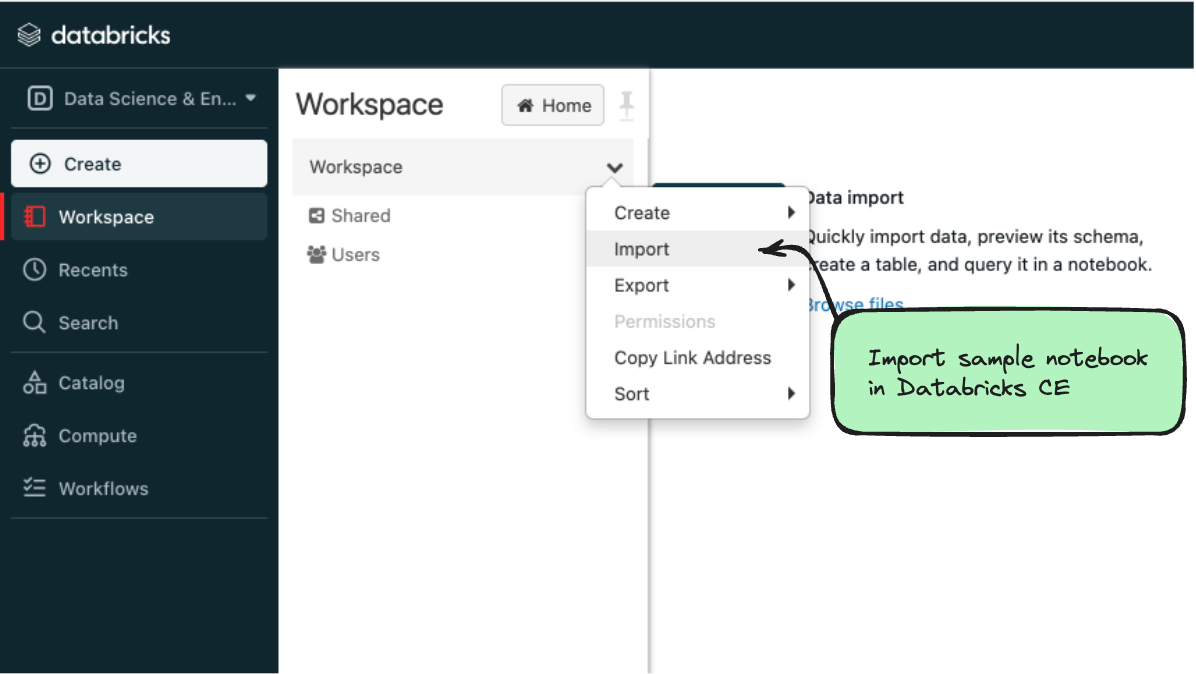
If you want to try a tutorial from the MLflow website, you can use Databricks CE to quickly test (and modify, if you're inclined) the tutorial. For example, if you wanted to test the Creating Custom Pyfunc tutorial:
- Click Workspace and select “Import notebook”
-
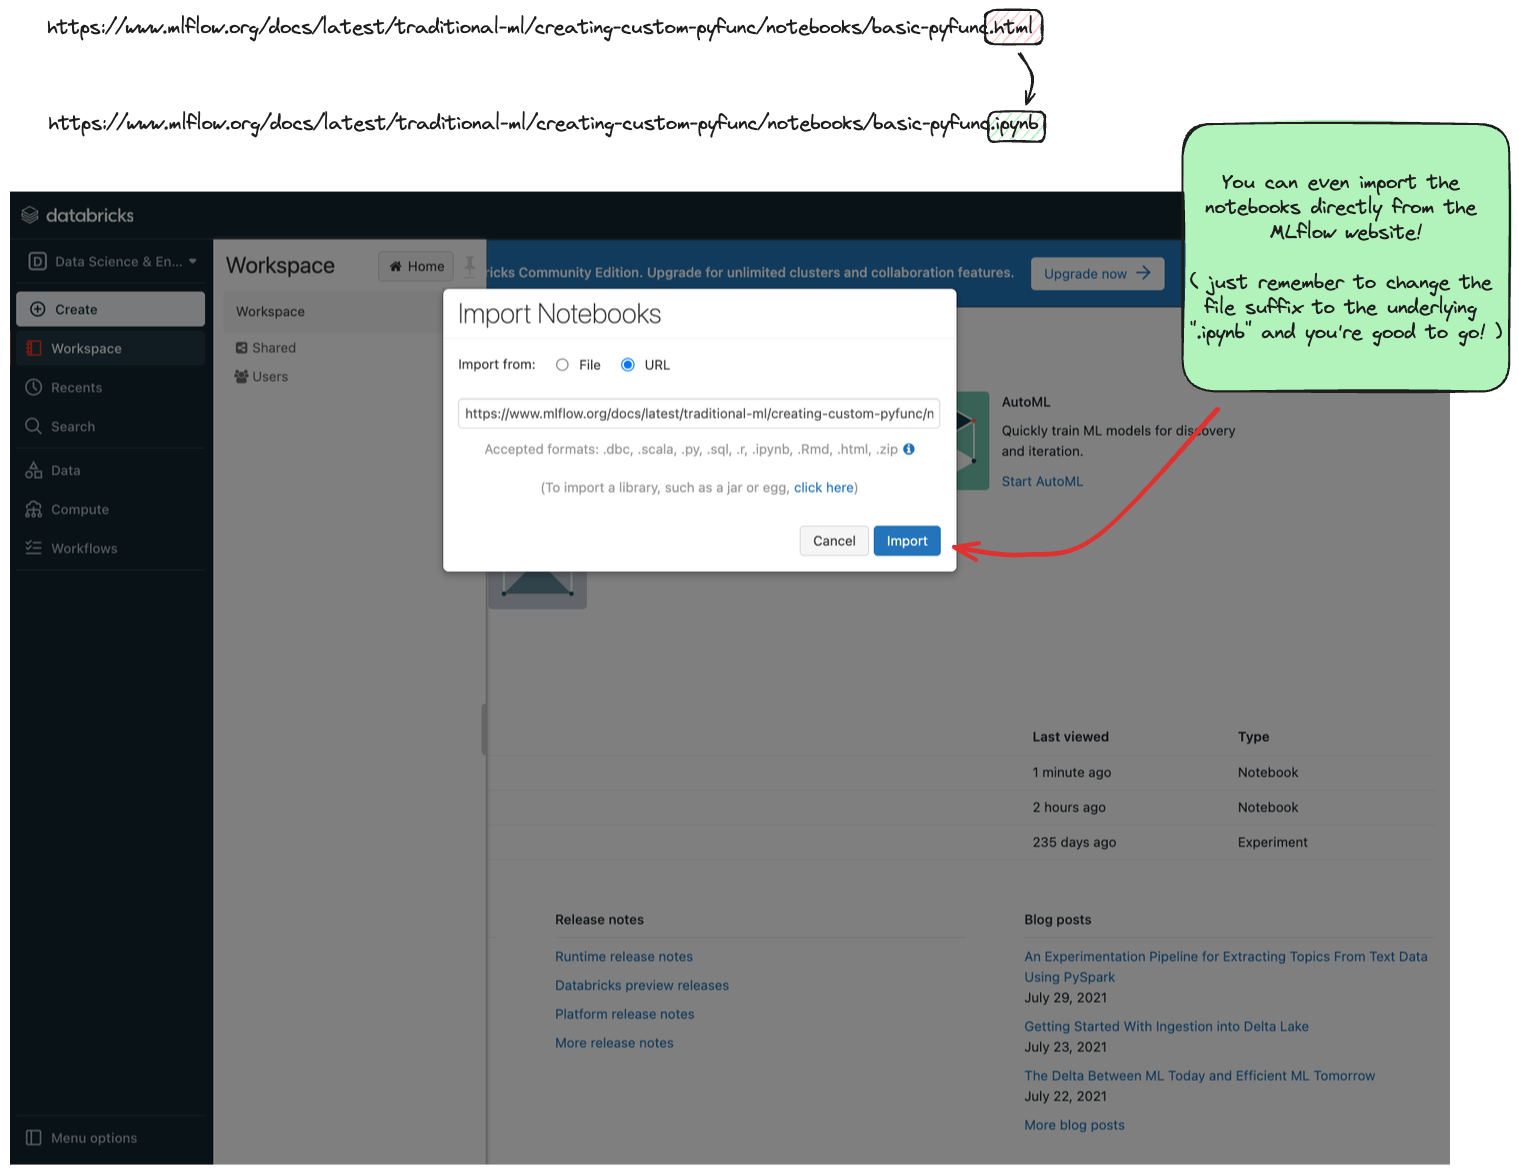
Use the
URLoption to import the notebook directly from the MLflow documentation website. For this example, to import, replace the last element of the url fromhtmltoipynb. This can be done with any of the tutorial or guide notebooks that are hosted on the MLflow website..../notebooks/basic-pyfunc.
html→ .../notebooks/basic-pyfunc.ipynb3
Conclusion
Databricks Community Edition (CE) offers an accessible and collaborative platform for MLflow experiment tracking, presenting several advantages. Its setup process is effortless and quick, providing a user-friendly experience. Additionally, it's free to use, making it an ideal choice for beginners, learners, and small-scale projects.
Getting started
Try out the notebook on Databricks
Further Reading
-
Learn more about different methods to setup your tracking server
-
Learn more about running Tutorial Notebooks with Databricks CE
Footnotes
-
The Model Registry and Model Deployment features are not available in the Databricks Community Edition. ↩
-
Databricks CE only supports basic authorization signin (username / password). For more advanced and secure authorization setups, only the full Databricks product supports those. ↩
-
Or you can download the notebook and manually load it in the UI by selecting
Fileinstead ofURL. ↩
